A couple of days back I logged into CloudFlare and noticed that they are using a new captcha system on the login page, hCaptcha.
Now if you have been on the internet long enough, you would have encountered Google’s reCaptcha (from CAPTCHA – Completely Automated Public Turing test to tell Computers and Humans Apart), that annoying pop-up where you either need to type in some squiggly text (last time), click a bunch of picture or just click a checkbox before you can submit that funny cat photo. This is to prove that you are really a human posting the above-mentioned cat photo and not some bot trying to spam or probe the funny cat website.
The idea of hCaptcha is to reduce the footprint of Google on users, considering they have their finger in pretty much every pie. Supposedly, hCaptcha captures a minimal amount of user information since they are not interested in advertising or selling personal data. They tout that they have a better experience but as of now, that doesn’t seem to be the case, since I trigger the captcha pretty much all the time… (Maybe I am a bot…) But I believe as more users use the service, they should be able to better tell bots from humans.
Now back to the meat of this post. After seeing Cloudflare’s switch to hCaptcha, I figured I could make use of CAPTCHAs to reduce the impact of bots on the services I have exposed to the internet, such as WordPress here and Owncloud and a few other services. Since I’m the main user of the services, it doesn’t frustrate me to click on CAPTCHAs. Besides, for every CAPTCHA solved, I get paid (though pretty much next to nothing :P)
WordPress was pretty easy since there is already a plugin developed by the hCaptcha and the community.
Next was to add hCaptcha in the OwnCloud service that I am running. This is where my problem arise. Apparently, not many people have done CAPTCHA integration on Owncloud, since I couldn’t find much resource online. The only one I found was this github repo by a Taiwanese IT Service Provider. However, it seems like they the are self-hosting the reCaptcha javascript and validating the somewhere using javascript. Problem is, I’m not a developer, much less a JS developer, so for the life of me, I can’t tell how they are validating the CAPTCHA with reCaptcha. Also, they are self-hosting reCaptcha code, so if they are any updates, they will have to manually update the JS file. Good for air-gapped network, not so good for lazy people like me. So, taking reference from that repo and also the hCaptcha blog post on PHP integration , I made my own changes to OwnCloud to enable hCaptcha. Here are the steps to save you some frustration and hours.
*Disclaimer: I am a systems administrator by trade and not a developer. What I lack in coding skills, I make up in hacking things to work. So my solution will be very ugly to PHP developers out there. Also, I’m making changes to OwnCloud core files, so the next update, *poof* all the customisations will be gone.
First things first, sign up for a hCaptcha account and take note of the site key and secret key. Guard your secret key and don’t expose it on any public facing page/script.
Next is to add hCaptcha to the login, this step is pretty simple, just add two lines of HTML to login.php
Take note to input the site key from hCaptcha.
I’ve placed the hCaptcha button after the <fieldset> stanza so as not to mess up the existing CSS.
<?php /** @var $l \OCP\IL10N */ ?>
<?php
vendor_script('jsTimezoneDetect/jstz');
script('core', [
        'visitortimezone',
        'lostpassword',
        'login',
        'browser-update'
]);
?>

<!-- Add hCaptcha JavaScript Library -->
<script src='https://www.hCaptcha.com/1/api.js' async defer></script>
<!--[if IE 8]><style>input[type="checkbox"]{padding:0;}</style><![endif]-->
<form method="post" name="login">
...
        </fieldset>
        <!-- Add hCaptcha Button -->
        <div class="h-captcha" data-sitekey="SITE KEY"></div>
</form>
After adding the hCaptcha, you will find that OwnCloud wouldn’t load the hCaptcha button, this is due to the OwnCloud CSRF Policy. So the next thing is to grant the hCaptcha domain permission to load scripts. Edit the LoginController.php file to add the policy in the showLoginForm() function.
        public function showLoginForm($user, $redirect_url, $remember_login) {
...
                if (!empty($redirect_url) && ($remember_login === null) &&
                        ($this->userSession->isLoggedIn() === false) &&
                        (\strpos($this->urlGenerator->getAbsoluteURL(\urldecode($redirect_url)),
                                        $this->urlGenerator->getAbsoluteURL('/index.php/f/')) !== false)) {
                        $parameters['accessLink'] = true;
                }

                // CSRF Policy for hCaptcha
                $response = new TemplateResponse($this->appName, 'login', $parameters, 'guest');
                $csp = new ContentSecurityPolicy();
                        $csp->addAllowedImageDomain('*.hcaptcha.com');
                        $csp->addAllowedImageDomain('hcaptcha.com');
                        $csp->addAllowedMediaDomain('*.hcaptcha.com');
                        $csp->addAllowedMediaDomain('hcaptcha.com');
                        $csp->addAllowedFrameDomain('*.hcaptcha.com');
                        $csp->addAllowedFrameDomain('hcaptcha.com');
                        $csp->addAllowedStyleDomain('*.hcaptcha.com');
                        $csp->addAllowedStyleDomain('hcaptcha.com');
                        $csp->addAllowedScriptDomain('*.hcaptcha.com');
                        $csp->addAllowedScriptDomain('hcaptcha.com');
                $csp->allowInlineScript(true);

                $response->setContentSecurityPolicy($csp);
                return $response;

                //return new TemplateResponse(
                //      $this->appName, 'login', $parameters, 'guest'
                //);
Now that we can load the hCaptcha button, next is to validate the hCaptcha response during login. After performing CAPTCHA check, hCaptcha will include the h-captcha-response in form data, so we will validate this response with hCaptcha’s siteverify API. Again, edit the LoginController.php file, but this time we are interested in the tryLogin() function.
Take note to input the secret key from hCaptcha.
        public function tryLogin($user, $password, $redirect_url, $timezone = null) {
                // Check if h-captcha-response is present and validate hCaptcha response
                if(isset($_POST['h-captcha-response']) && !empty($_POST['h-captcha-response'])){
                        $data = array(
                                'secret' => "SECRET KEY",
                                'response' => $_POST['h-captcha-response']
                        );
                        $verify = curl_init();
                        curl_setopt($verify, CURLOPT_URL, "https://hcaptcha.com/siteverify");
                        curl_setopt($verify, CURLOPT_POST, true);
                        curl_setopt($verify, CURLOPT_POSTFIELDS, http_build_query($data));
                        curl_setopt($verify, CURLOPT_RETURNTRANSFER, true);
                        $verifyResponse = curl_exec($verify);
                        $responseData = json_decode($verifyResponse);

                        if($responseData->success !== true) {
                                $this->session->set('loginMessages', [
                                        ['invalidCaptcha'], []
                                ]);
                                $args = [];
                                return new RedirectResponse($this->urlGenerator->linkToRoute('core.login.showLoginForm', $args));
                        }
                }
                else {
                        $this->session->set('loginMessages', [
                                ['invalidCaptcha'], []
                        ]);
                        $args = [];
                        return new RedirectResponse($this->urlGenerator->linkToRoute('core.login.showLoginForm', $args));
                }
                $originalUser = $user;
                // TODO: Add all the insane error handling
                $loginResult = $this->userSession->login($user, $password);
Notice the ‘invalidCaptcha’ error handling? We need to code this into login.php. Edit login.php again.
                <?php if (!empty($_['accessLink'])) {
                ?>
                        <p class="warning">
                                <?php p($l->t("You are trying to access a private link. Please log in first.")) ?>
                        </p>
                <?php
        } ?>
                <?php if (!empty($_['invalidCaptcha'])) {
                ?>
                        <p class="warning">
                                <?php p($l->t("Invalid/Missing Captcha. Please try again.")) ?>
                        </p>
                <?php
        } ?>
                <?php if ($_['rememberLoginAllowed'] === true) : ?>
                <div class="remember-login-container">
                        <?php if ($_['rememberLoginState'] === 0) {
                ?>
And done! Now OwnCloud is protected with hCaptcha!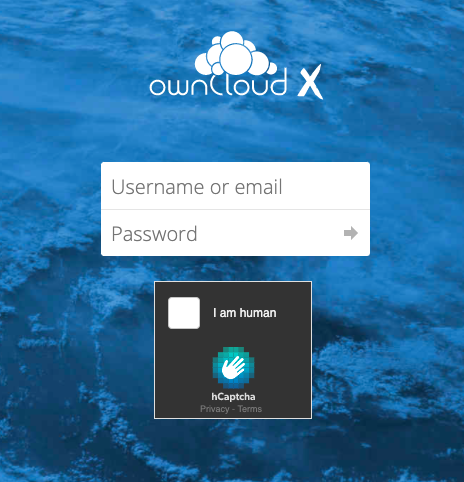
To change the look and feel of the hCaptcha button, you can play with the themes of the button.
Remember to backup the edited files so that they are not lost when you upgrade OwnCloud.
I have also shared my php files on GitHub.
Hello, I must mention that your article is very helpful, but unfortunately, it does not work in the current versions of OwnCloud. Is it possible for you to recreate these codes in the latest version?”
Ah… I haven’t looked at the current versions of OwnCloud… I’ll try to take a look when I have the time and update the codes accordingly. Thanks for the heads up!